
Linux vDisk Boot Plugin
This plugin is used by Ventoy to boot vdisk file (vhd/vdi/raw ...with a Linux distro in it) on a real machine.
Both Legacy BIOS and UEFI are supported. The advantages of this model are:
1. The Linux OS runs on a physical machine, not in a virtual machine, so there is no loss in efficiency.
2. One vhd/vdi file can be booted in both Legacy BIOS mode and UEFI mode.
3. The Linux OS does not need a disk or partition, just in a file.
For example, Windows is your main OS, and you put some Ubuntu/Debian/Arch... VHD files in D:\
You can boot any of them as you want. If you don't need it anymore, just delete it as a normal file.
- Supported vDisk Format
- Fixed size vhd (vhdx is not supported)
- Fixed size vdi
- Raw Disk Image
- Supported Linux Distros (Updating)
| Distro | Test ISO | Legacy BIOS | UEFI | Notes |
|---|
- Usage
- Install Linux to vDisk
- run vtoyboot script in the Linux OS
- Copy to USB drive, change the suffix to .vtoy and boot with Ventoy
- About the system update
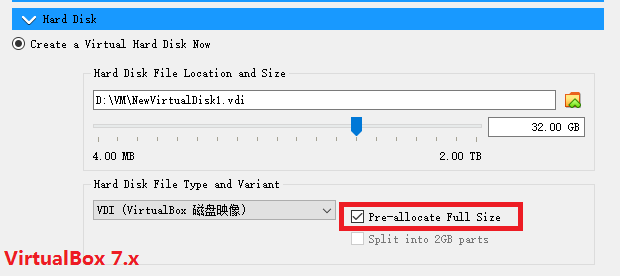
Create vhd/vdi with fixed size (dynamic type not supported) and install supported Linux distro into the vhd/vdi.
You can make use of VirtualBox, the installation process is no different from normal installation.
The virtual hard disk must be newly created, do not use the existing ones.
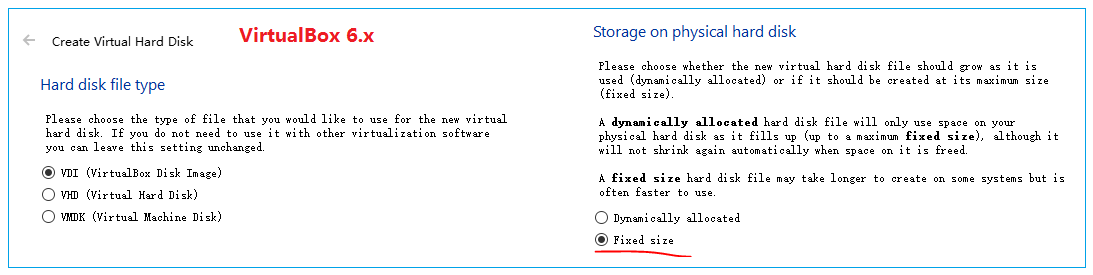
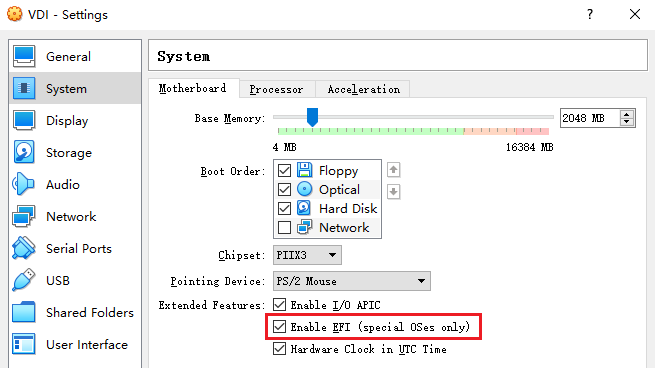
In order to make the vhd/vdi file bootable in both Legacy BIOS mode and UEFI mode.
You must set VirtualBox to UEFI mode before install OS !!!
!!! Attention !!!
For some distros, we need to install an additional grub package to make the final vhd/vdi file bootable in Legacy BIOS mode.
For this, there is an explanation in the "Notes" column at the end of the previous table. If there is no special explanation, it is not necessary.
Take deepin-desktop-community-1010-amd64.iso for example, grub-pc-bin_2.02.24.3-1+eagle_amd64.deb is needed.
This package is at /pool/main/g/grub2/ directory of the ISO file and can be installed with dpkg -i command.
Can NOT create snapshot of the VirtualMachine, or the vdi/vhd will be unbootable.
After install and boot into the linux distro. Run vtoyboot script to make some process to support Ventoy boot.
vtoyboot is a project developed with Ventoy and released separately. Download its package from here:
https://github.com/ventoy/vtoyboot/releases
Put the downloaded package into the linux distro, decompress it and run vtoyboot.sh as root sudo sh vtoyboot.sh
Note that vtoyboot will be updated to support more Linux distros and fix bugs, so please use the latest release.
After completing the first 2 steps, now you can copy the vdi/vhd file to the Ventoy USB drive and boot it.
For facilitate identification and processing, you MUST change the file suffix to .vtoy. This is mandatory.
It is recommended to keep the original suffix while adding a .vtoy suffix. For example:
CentOS7.vhd.vtoy ubuntu20.04.vdi.vtoy Manjaro.vhd.vtoy
After you boot vDisk in a physical machine, you can install and upgrade ordinary software without restrictions. However, if you update the linux kernel or driver, or update the whole system (e.g. with dnf update in fedora). You need to run the vtoyboot script again after the update or there is a certain probability that the vDisk will not boot next boot.
- Boot vDisk at Local disk by Ventoy
The manual above is for copy the vdisk file to the USB drive and boot with Ventoy. You can also boot a vdisk file in local disk by Ventoy.
Method 1
Please refer Boot Image Files In Local Disk
Method 2
Please refer Menu Extension Plugin for details about the custom boot menu.
Add a menu like follows to ventoy_grub.cfg, only need to change my_vdisk_path to the absolute path of the actual file (from the root of that partition).
menuentry "Boot My Linux VHD" {
    set my_vdisk_path="/VhdDir/Ubuntu.vhd.vtoy"

    if search -n -s vdiskhd -f "$my_vdisk_path"; then
        vtoyboot_common_func "($vdiskhd)$my_vdisk_path"
    else
        echo "$my_vdisk_path not found"
    fi
}
In this example, my_vdisk_path is set to /VhdDir/Ubuntu.vhd.vtoy you can change it to your customized path (e.g. set my_vdisk_path="/images/LinuxMint.vdi.vtoy").
You don't need to specify which HD the file is on. It will use search command to enumerate all the HDs to find the file.
Attention that the following formats are INVALID:
set my_vdisk_path="(hd1,1)/VhdDir/Ubuntu.vhd.vtoy"
set my_vdisk_path="E:\VhdDir\Ubuntu.vhd.vtoy"
set my_vdisk_path="\VhdDir\Ubuntu.vhd.vtoy"
- Boot vDisk from other bootloaders
You can also boot to vdisk file from other bootloaders(e.g. grub4dos/grub2/rEFInd/...). So you can enjoy vdisk boot even without Ventoy.
Please refer https://github.com/ventoy/vdiskchain for details.