A lot of users have encountered Windows 10 failing to boot. There are many factors can cause this. Fortunately, there are also a couple of methods that can help you with the problem. This post from EaseUS will present 8 ways to repair your Windows 10 won't boot.
There are a few possible reasons that are preventing your Windows 10 from booting up correctly.
Windows 10 startup issue is a common problem that is frequently discussed in the forum. Don't worry if you are experiencing it now. Here is one of the examples from Microsoft.
"Hello there. Could someone help me with the Win 10 won't start problem? I really need support. Any help will be appreciated."
Here the following, you’ll see 8 fixes that work to fix Windows won’t boot issue for you on all types of computers and laptops. Move on to learn the details.
Before you perform other solutions, you should first check the peripherals connected to your computer. These common problems are can be easily ignored by users. Follow the guide below and see if they work.
If none of them can help you, read on to learn more.
The Boot Configuration Data (BCD) stores the boot-time configuration data for your Windows. It contains details on the operating system and how to boot the computer. The BCD file will cause your Windows 10 to be unbootable when it's damaged or missing.
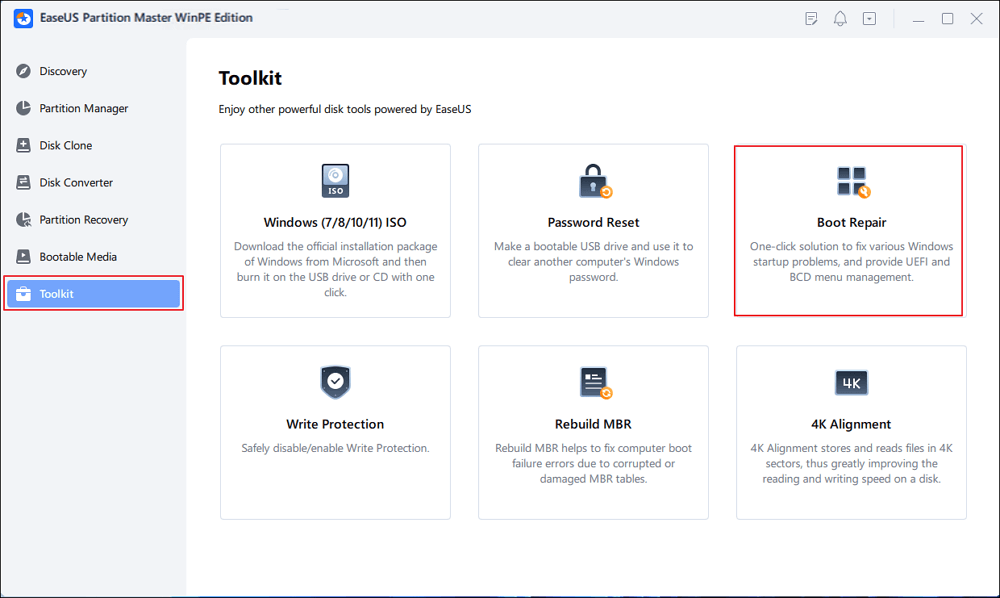
In this case, a professional tool, EaseUS Partition Master Professional, can help you deal with the problem. It has multiple features and supports Windows 11/10/8/7. A feature called Boot Repair can rebuild BCD and bring your computer back to normal in a simple and fast way.
Follow the detailed steps to learn how.
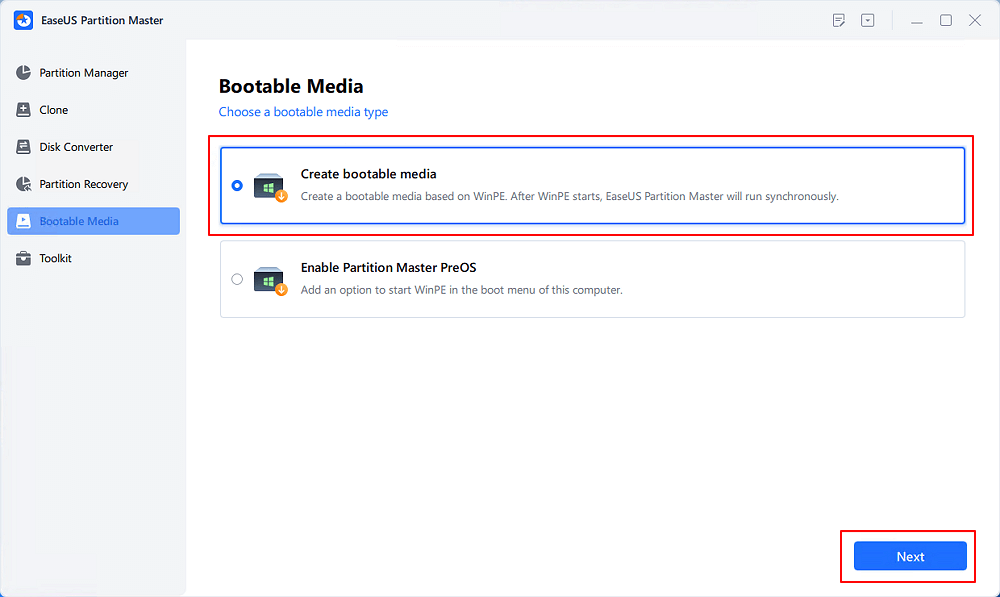
Step 1. Connect the external drive/USB to your computer and run EaseUS Partition Master. Then, go to "Bootable Media" and select "Create bootable media".
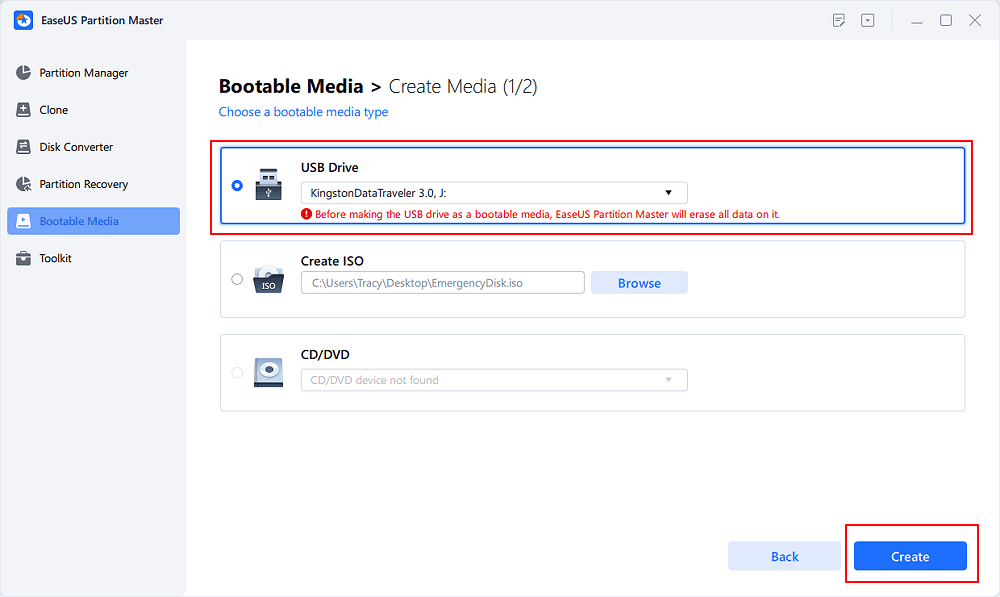
Step 2. Select an available USB Drive or CD/DVD and click "Create." You can also burn the Windows ISO file to the storage media.
Step 3. Insert the bootable drive to the computer that can’t boot. Reboot it by pressing and holding F2/Del to enter the BIOS. Then, set the WinPE bootable drive as the boot disk and press F10 to exit.
Step 4. Boot the computer again and enter the WinPE interface. Then, open EaseUS Partition Master and click "Boot Repair" under the "Toolkit" option.
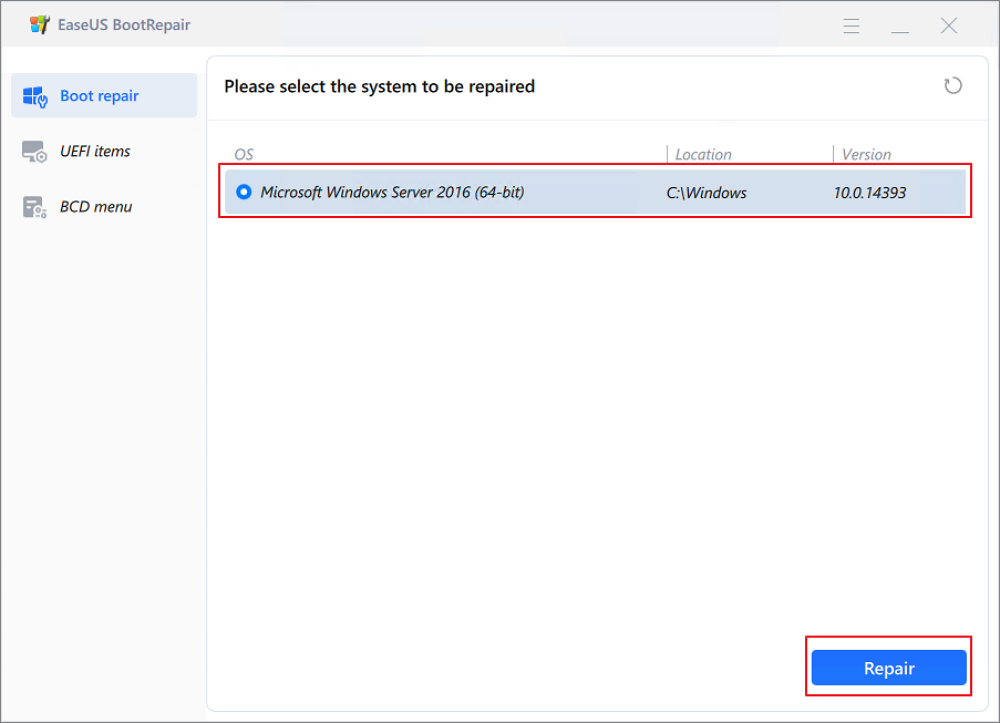
Step 5: Select the system that needs to be repaired. Then, click "Repair."
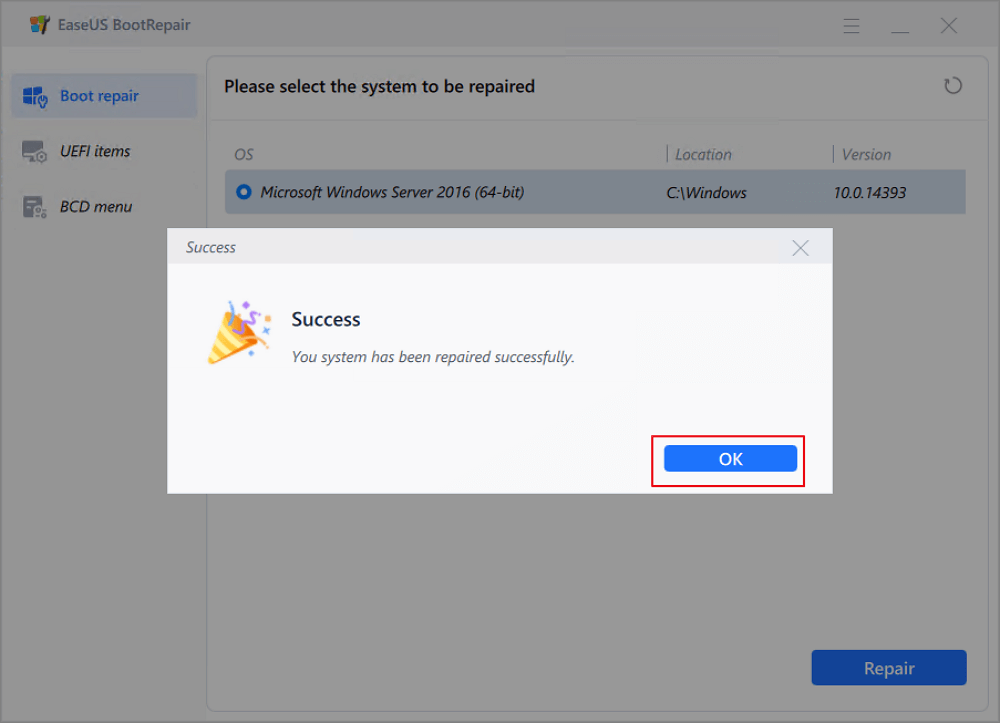
Step 6. A message showing that the system has been successfully repaired will appear. Click "OK" to complete.
Finally, set the computer to boot from the original drive. Then, try to restart the PC and see if the problem is fixed.
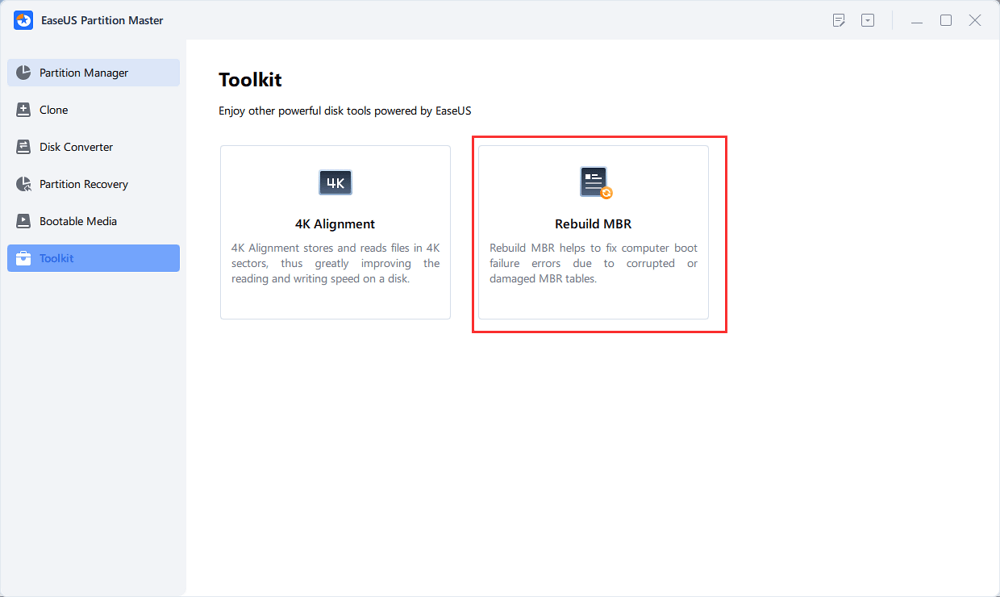
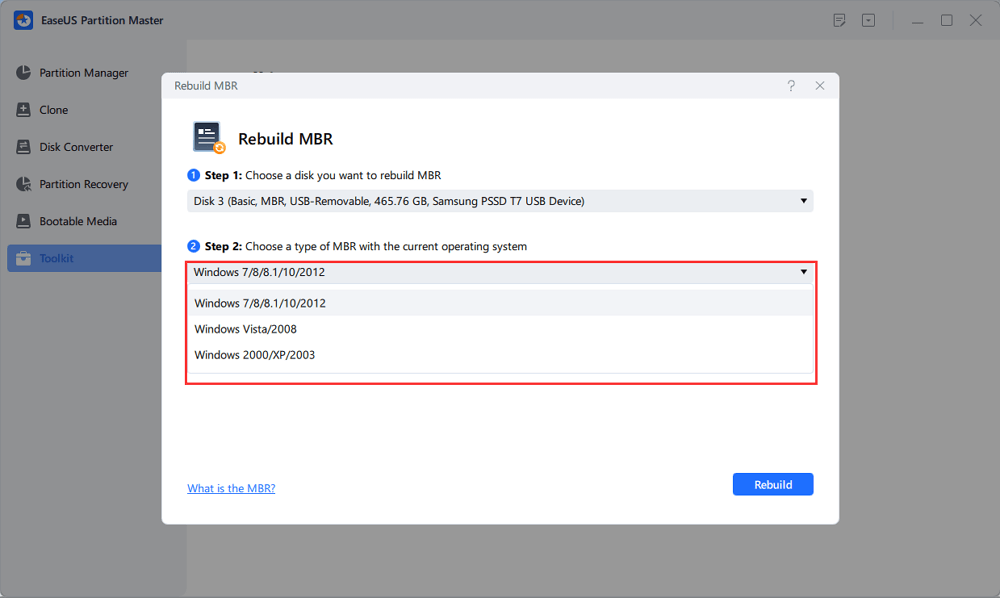
If a message saying "Operating System not found" shows up or a blank screen without any message when you boot the computer, the Master Boot Record (MBR) of your OS is corrupted. In this situation, rebuilding MBR with EaseUS Partition Master can easily fix the issue.
Here is the guide with steps:
Step 1. Create a WinPE bootable disk
Step 2. Boot EaseUS Partition Master Bootable USB
Step 3. Rebuild MBR
Now, the MBR of your system should be repaired. Reboot the PC and check the state of the computer.
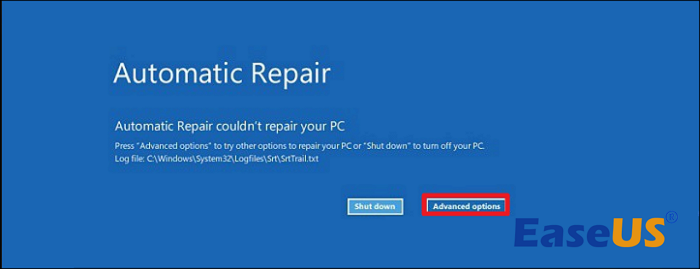
Automatic Repair is a built-in Windows feature that automatically fixes boot-related problems when a startup issue occurs.
It resolves the issues caused by corrupt registry entries, the boot configuration data, disk metadata corruption on the MBR, boot sector, file system, bad memory, partition table, and missing or corrupt system files and drivers.
Follow the steps below to run this powerful tool.
Step 1. Repeat turning your computer on and off for 3 times when you see the Windows logo. Your PC will run Automatic Repair.
Step 2. Click "Advanced options" to proceed.
Step 3. Select "Troubleshoot > Advanced options > Startup Repair".
Step 4. Wait for the process to finish.
Now, check if your computer is bootable or not.
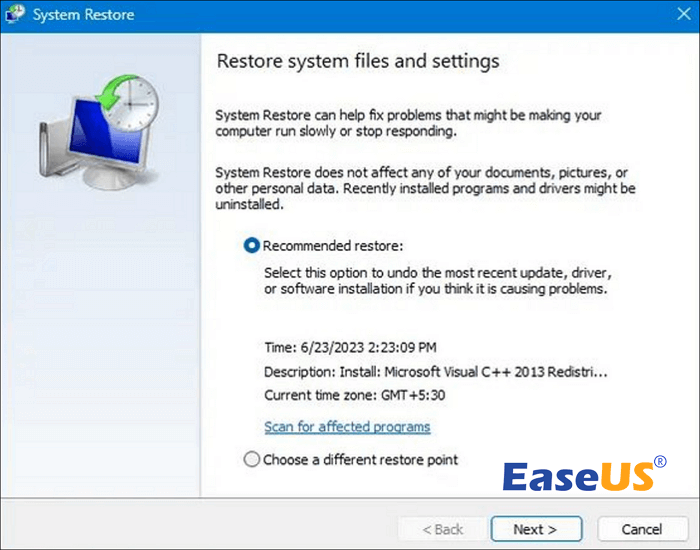
System Restore is a Windows feature that is used to protect and restore the operating system. Using system restore is useful when it is required to reverse system changes back to the previous restore point.
When an installation fails or there is a corruption of data, System Restore takes the files, keys, drivers, and settings from the most recent restore point to fix the Windows environment. You don't need to reinstall the operating system with this tool.
Step 1. Tap "F11" when turning on your computer. You will access the Advanced Startup screen.
Step 2. Choose "Troubleshoot > Advanced options > See more recovery options > Startup Settings > Restart".
Step 3. Hit "6" or "F6" to get into the safe mode with CMD.
Step 4. Run CMD as an administrator. Type rstrui.exe and hit "Enter".
Step 5. The restore point settings will appear. Select "Recommended restore" or "Choose a different restore point", and follow the onscreen guide to complete the rest.
(The system creates a restore point once a week by default. Or, you can create a restore point manually.)
Now you can restart the computer. The problem should probably be fixed.
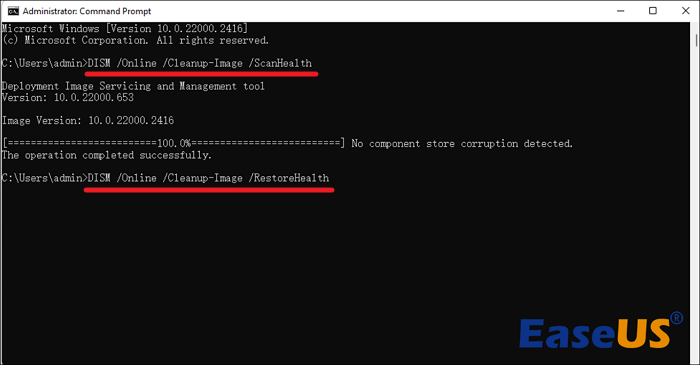
Deployment Image Servicing and Management (DISM) and System File Checker (SFC) scans are Windows commands that can automatically scan and fix your computer for missing or corrupt system files.
Step 1. Tap "F11" when turning on your computer. You will access the Advanced Startup screen.
Step 2. Select "Troubleshoot > Advanced options > Command Prompt".
Step 3. Type in DISM /Online /Cleanup-Image /ScanHealth and hit "Enter".
Step 4. Type in DISM /Online /Cleanup-Image /RestoreHealth and hit "Enter".
Step 5. Type in sfc /scannow /offbootdir=c:\ /offwindir=c:\windows and hit "Enter".
Performing the DISM and SFC scan can help you repair corrupt system files. Now, check if your PC boots properly.
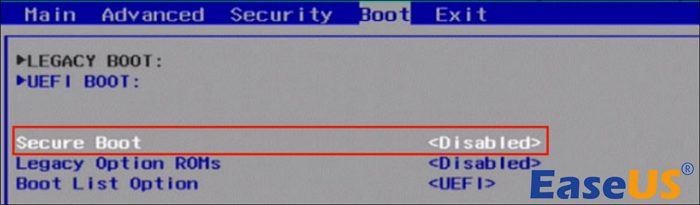
Secure Boot was created to safeguard computers against malware. If you configure it incorrectly, your computer may fail to boot. You can disable Secure Boot in the BIOS.
Step 1. Restart your computer.
Step 2. Hold down a specific key, such as "F1, F2, F10, Esc, and Delete", or key combinations like "Ctrl + Alt + Delete" or "Ctrl + Alt + Esc" when you see the logo. (Based on the manufacturer)
Step 3. Use the arrow keys to navigate to the security or boot section of the BIOS or UEFI settings menu.
Step 4. Select "Secure Boot" and set it as "Disabled".
However, if you disable it, your computer may require you to perform a factory reset of Windows 10 and reset your BIOS. Additionally, disabling Secure Boot could also prevent you from upgrading the system to Windows 11.
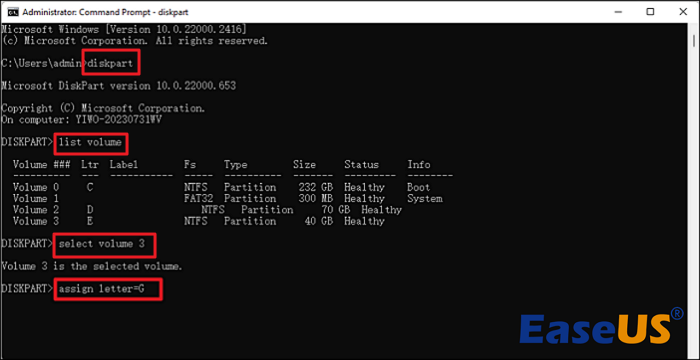
On a system with more than one drive installed, if the Windows OS volume's drive letter is mistakenly unassigned, you may have trouble booting the computer. However, you can quickly resolve this issue by changing drive letters in the Command Prompt.
Step 1. Tap "F11" when turning on your computer. You will access the Advanced Startup screen.
Step 2. Select "Troubleshoot > Advanced options > Command Prompt".
Step 3. Type in diskpart and hit "Enter".
Step 4. Type list volume and hit "Enter".
You need to assign a letter for your boot volume if it doesn't have one.
Step 5. For example, type select volume 3 to select the volume and hit "Enter".(The number may differ based on your condition.)
Step 6. Type assign letter=G and hit "Enter". (Choose an available letter from the alphabet.)
This method is not friendly to a Windows beginner since a mistake can be easily made here and cause further trouble.
If you want to avoid the inconvenience of Windows 10 not booting again, you may take a few actions to make sure that your PC remains functional.
It is best to keep your antivirus software up to date and running in the background. This will safeguard your system from viruses, malware, and dangerous programs. They can all cause troubles with the booting process. It is highly recommended to use a disk optimizer and registry cleaner since they keep your system working smoothly.
Keeping your BIOS updated regularly is a good habit. It can resolve any difficulties created by outdated drivers as well as avoid specific issues in the first place. Also, do remember to keep your device drivers up to date. Outdated drivers can create a variety of problems with your computer.
Regularly creating a System Restore Point can ensure you have the latest settings and data backed up. It allows you to restore the system to the earlier state if there is a problem.
You can easily avoid Windows 10 won't boot again by following these tips and checking for updates and maintenance frequently.
Scenarios like a black screen when booting up the PC, the computer just keeping loading, or getting stuck on the logo screen are all the situations you may encounter when Windows 10 has trouble booting up. You can find the appropriate way to fix this from the guide above.
However, if none of these methods work, the last option is to reinstall the Windows 10 operating system. It should be able to fix all the problems except for the issues caused by hardware or other peripherals.
Misconfigured settings could lead to black screen issues. For example, the projection settings could be inaccurate, or the boot configuration data (BCD) store could be corrupted. Black screens can also be caused by internal components, hardware, and peripherals issues.
A faulty motherboard, piece of RAM, or video card might lead Windows to fail to boot. You can generate and use an Ultimate Boot CD to check for hardware problems. It has a set of diagnostic applications for identifying and fixing hardware faults.
To troubleshoot a Windows PC that won't turn on, first rule out a broken power source or outlet. Check for beep codes, display problems, strange BIOS settings, or troubleshoot the PC in Safe Mode. Other solutions include unplugging non-essential devices and examining the system for loose components and malware.